> ## Documentation Index
> Fetch the complete documentation index at: https://docs.stopbars.com/llms.txt
> Use this file to discover all available pages before exploring further.
# Preparation
Before starting a contribution, make sure your scenery package, simulator, and BARS Pilot Client are ready. You'll create and edit the draft in your browser, then test the lighting in your simulator.
**Prerequisites**:
Before you begin, you must have the following:
1. The exact scenery package you want to support.
2. MSFS 2020, MSFS 2024, or X-Plane installed with that scenery.
3. The BARS Pilot Client installed for the in-simulator test.
Use the same scenery package when you create, edit, and test the draft. If you reconnect a different package, the editor warns that the scenery no longer matches the draft source.
## Start from the Dashboard
Open the [Contribution Dashboard](https://stopbars.com/contribute). It has two views:
* **All Contributions** lists approved airport and scenery combinations. You can search by airport, scenery, or simulator and download an approved XML file.
* **Your Contributions** shows your approved, pending, and rejected submissions. It also shows a status summary.
The leaderboard lists the community's top contributors.
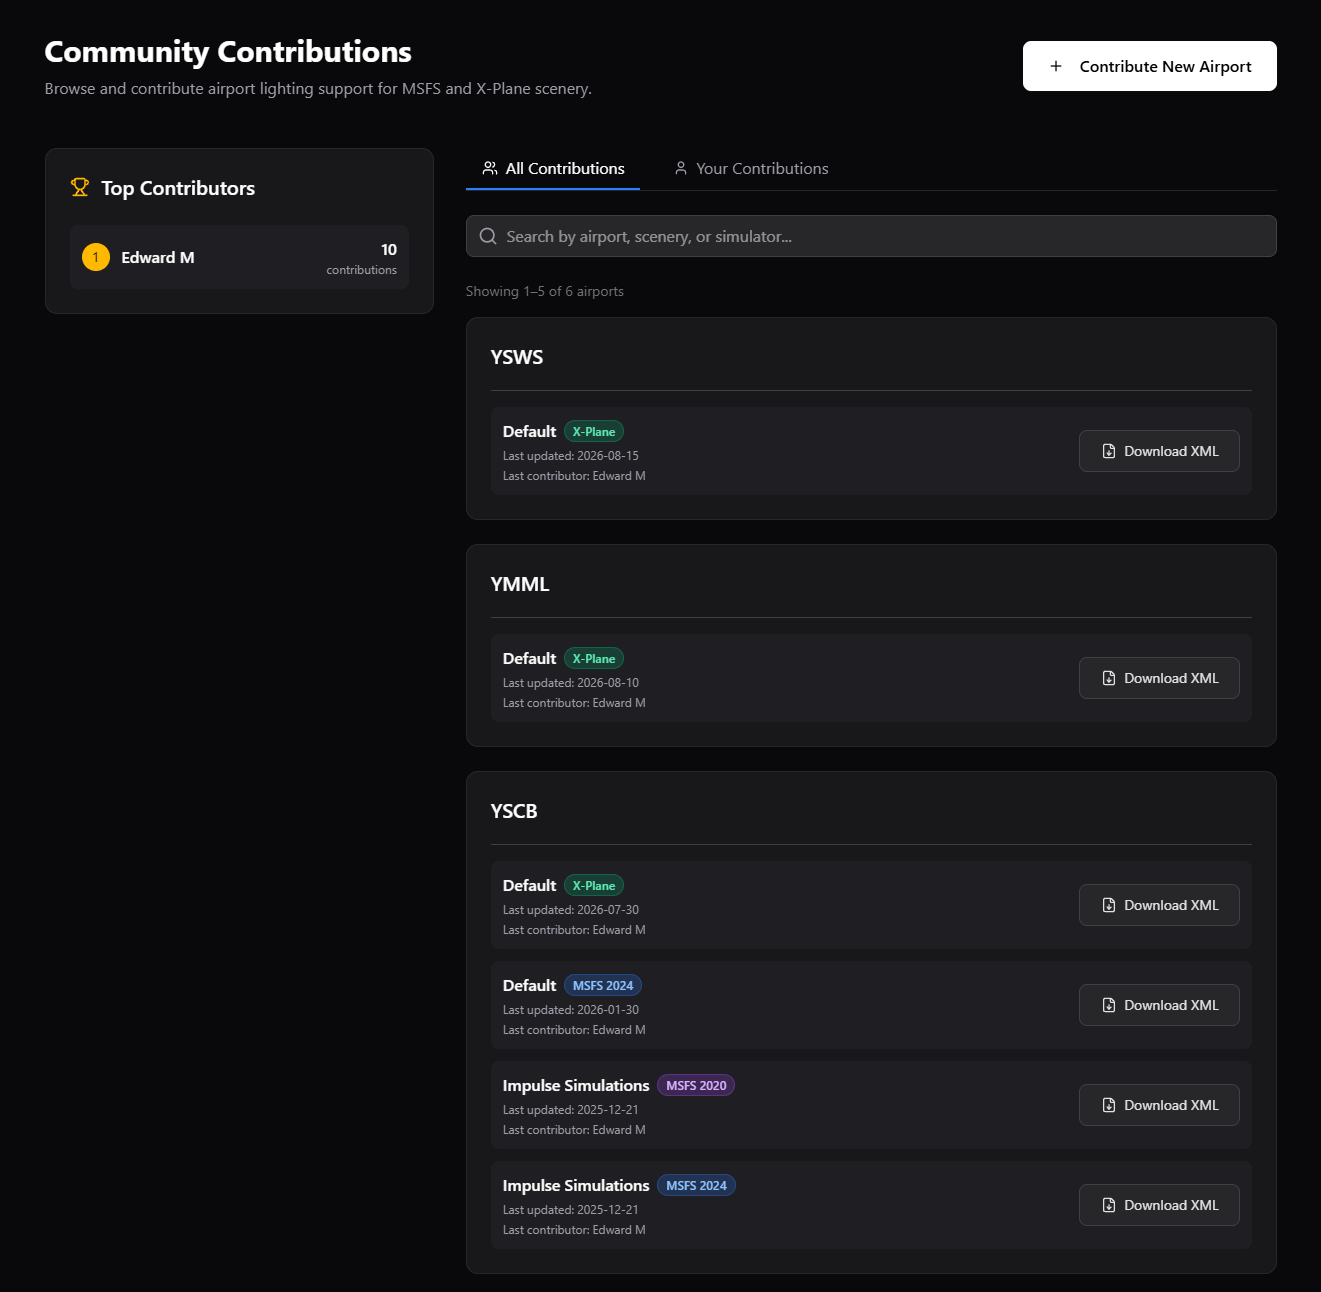 Click **Contribute New Airport** on the dashboard. The button is available after you sign in.
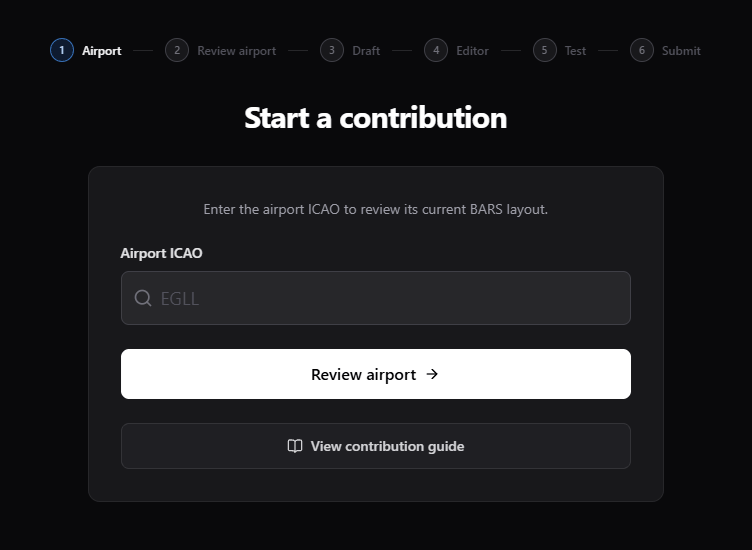
Enter the airport's four-character ICAO code.
BARS loads the airport layout and contribution policy.
Click **Contribute New Airport** on the dashboard. The button is available after you sign in.
Enter the airport's four-character ICAO code.
BARS loads the airport layout and contribution policy.
 ## Legacy MSFS Workflow
You may need to use the legacy workflow when the experimental MSFS browser editor is unavailable for your selected scenery package or cannot render it correctly. This lets you build the contribution with the simulator's developer tools and upload the resulting XML at the test step.
Start MSFS and enable Developer Mode:
Open **Options > General Options > Developers**, then turn **Developer Mode** on.
Open **Settings > General > Advanced Options**, then turn **Developer Mode** on.
Start a flight at the airport you are mapping before opening the Scenery Editor.
Open the Project Editor:
Select **Tools > Project Editor**, then **Project > New Project**.
Select **Editors > Project Editor**, then **Project > New Project**.
Name the project `BARS Maps` and choose where to save it. MSFS 2024 may display the name as `BARS-Maps` because it replaces spaces with hyphens.
In the package wizard:
1. Choose **Package**, then **Custom**.
2. Use `bars-maps` as the package name and `BARS Maps` as its display name.
3. Set **Content-Type** to `SCENERY`.
4. Continue to the asset group screen.
Name the asset group using the airport and scenery:
```text theme={null}
[ICAO]-[Scenery Name]
```
For example, use `EGLL-iniBuilds` for the iniBuilds scenery at Heathrow.
Create a separate asset group for every airport and scenery package you map.
Set **Asset Type** to `BGL`, create the group, then select **Load In Editor**. Save the project before placing polygons.
For each object on the BARS airport review map:
1. Copy its BARS ID.
2. In the Scenery Editor's **Objects** panel, select **Polygon**, then **Add**.
3. Hold **Control** and left-click to place each point.
4. Press **Enter** to finish the polygon.
5. In **Properties**, set **Display Name** to the exact BARS ID, such as `BARS_0GHSI`.
Shape the polygon along the stop bar, lead-on lights, or other object it represents. Repeat this for every object you want to include.
Draw polygons around default MSFS lights that BARS will replace. Set the display name of each removal polygon to `remove`.
Only cover the lights that need to disappear. Do not place removal polygons over runway or scenery lights that should remain visible.
Select **Save Scenery** and save the XML inside the BGL asset group's **Asset Directory**, usually its scenery folder under `PackageSources`. You can use **Control + S** for later saves.
Return to the airport review page, select **Skip to test**, and upload the saved scenery XML.
Check the browser preview before opening the contribution in the BARS Pilot Client. If an object is missing, confirm that its polygon uses the exact BARS ID. If a removal is missing, confirm that its polygon is named `remove`.
## Next Steps
Once you have entered the airport ICAO, review its lighting layout before creating a draft.
Check the division layout and BARS IDs before creating a draft.
## Legacy MSFS Workflow
You may need to use the legacy workflow when the experimental MSFS browser editor is unavailable for your selected scenery package or cannot render it correctly. This lets you build the contribution with the simulator's developer tools and upload the resulting XML at the test step.
Start MSFS and enable Developer Mode:
Open **Options > General Options > Developers**, then turn **Developer Mode** on.
Open **Settings > General > Advanced Options**, then turn **Developer Mode** on.
Start a flight at the airport you are mapping before opening the Scenery Editor.
Open the Project Editor:
Select **Tools > Project Editor**, then **Project > New Project**.
Select **Editors > Project Editor**, then **Project > New Project**.
Name the project `BARS Maps` and choose where to save it. MSFS 2024 may display the name as `BARS-Maps` because it replaces spaces with hyphens.
In the package wizard:
1. Choose **Package**, then **Custom**.
2. Use `bars-maps` as the package name and `BARS Maps` as its display name.
3. Set **Content-Type** to `SCENERY`.
4. Continue to the asset group screen.
Name the asset group using the airport and scenery:
```text theme={null}
[ICAO]-[Scenery Name]
```
For example, use `EGLL-iniBuilds` for the iniBuilds scenery at Heathrow.
Create a separate asset group for every airport and scenery package you map.
Set **Asset Type** to `BGL`, create the group, then select **Load In Editor**. Save the project before placing polygons.
For each object on the BARS airport review map:
1. Copy its BARS ID.
2. In the Scenery Editor's **Objects** panel, select **Polygon**, then **Add**.
3. Hold **Control** and left-click to place each point.
4. Press **Enter** to finish the polygon.
5. In **Properties**, set **Display Name** to the exact BARS ID, such as `BARS_0GHSI`.
Shape the polygon along the stop bar, lead-on lights, or other object it represents. Repeat this for every object you want to include.
Draw polygons around default MSFS lights that BARS will replace. Set the display name of each removal polygon to `remove`.
Only cover the lights that need to disappear. Do not place removal polygons over runway or scenery lights that should remain visible.
Select **Save Scenery** and save the XML inside the BGL asset group's **Asset Directory**, usually its scenery folder under `PackageSources`. You can use **Control + S** for later saves.
Return to the airport review page, select **Skip to test**, and upload the saved scenery XML.
Check the browser preview before opening the contribution in the BARS Pilot Client. If an object is missing, confirm that its polygon uses the exact BARS ID. If a removal is missing, confirm that its polygon is named `remove`.
## Next Steps
Once you have entered the airport ICAO, review its lighting layout before creating a draft.
Check the division layout and BARS IDs before creating a draft.