Configuring Your Airport Scenery Packages
With the plethora of scenery options available in simulators nowadays, pilots use a wide range of different scenery packages. Once the Pilot Client is installed, you’ll need to configure which scenery package you use for each supported airport.Finding Your Airport
Navigate to the Airport List section in the Pilot Client. You can search for airports by:- ICAO code (e.g.,
YPPH) - Package name (e.g.,
FlyTampa) - Airport name (e.g.,
East Midlands)
Selecting Your Scenery Package
1
Select your simulator
Select your simulator on the right through the simulator filter. This is purely a filter to only show airports compatible with each sim.
2
Find your desired airport
Use the search function to locate your airport.
3
Click the dropdown menu
Click the dropdown menu next to the airport ICAO code.
4
Choose a scenery package
Choose from the available scenery packages for that airport.
5
Verify your selection
Your selection will update where lights are placed in your simulator.
If an airport does not appear in the list or a specific scenery package is missing, it may not have been contributed yet. You can help contribute to BARS by following the scenery contribution guide.
Default Light Removal Package
Understanding the Default Light Removal Package
The BARS Pilot Client includes a default light removal package that is installed by default. This package automatically removes defaultbaked scenery lights at all BARS supported airports to prevent duplicate lighting after BARS spawns its own dynamic lights.Why This Package is Important
Without the default light removal package, you would see:- Duplicate lights at BARS supported airports
- Conflicting lighting from both scenery and BARS lights
- Confusion when identifying which lights are controlled by BARS
- Unrealistic lighting effects and positions
We strongly recommend keeping the default light removal package installed. Disabling it will result in duplicate, conflicting lights at BARS supported airports and negatively impact your visual experience. Only disable this package if you have a specific technical reason to do so.
Disabling the Default Light Removal Package (Not Recommended)
While we do not recommend it, if you still wish to disable the default light removal package, you can do so per airport:1
Open the BARS Pilot Client
Launch the BARS Pilot Client application.
2
Select your simulator
Select your simulator on the right through the simulator filter. This is purely a filter to only show airports compatible with each sim.
3
Find your desired airport
Use the search function to locate your airport.
4
Click the removals toggle
Toggle to turn removals on or off for that specific airport.
5
Restart your simulator
If your simulator is already open, you will need to restart it to update your removals preference. The Pilot Client will display an orange warning in the top right when a restart is required.
Airport Lighting With ATC Offline
Even when ATC is offline, a controller is not using BARS, or you are not connected to VATSIM, simply having the BARS Pilot Client open will spawn airport lighting in a “Default” state. This ensures your scenery always has appropriate lighting, preventing you from flying in an unlit environment.System Tray and Window Management
Minimize to System Tray
The Pilot Client can be minimized to your system tray for quick access while keeping your desktop clean. Click the minimize button in the top-right corner of the window to minimize the application to your system tray.System Tray Icon Settings
Right-click on the BARS Pilot Client icon in your system tray to access additional settings: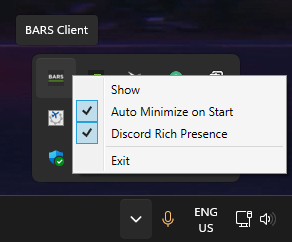
Auto Minimize on Start
Enabling Auto Minimize on Start will automatically minimize the Pilot Client to your system tray.We recommend enabling this setting after you’ve configured your scenery packages, so the application starts quietly in the background without taking up screen space.
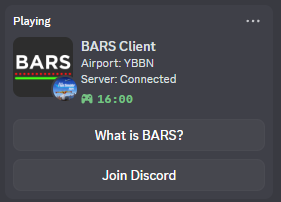
Discord Rich Presence
By default, Discord Rich Presence is enabled to show your activity in the BARS Pilot Client on your Discord profile. When enabled, your Discord status will display:- Your nearest airport (automatically detected from your simulator position)
- Your current server status (Connected, Disconnected, Error, or No VATSIM Connection)
- Your active connected flight simulator (MSFS 2020 or MSFS 2024) with a small icon indicator
If you wish to disable Discord Rich Presence, simply uncheck it in the system tray settings.
Auto-Start Configuration
Starting Pilot Client with the Flight Simulator
The BARS Pilot Client is configured to automatically launch when you start your flight simulator by default. This ensures BARS lights are active whenever you fly without requiring manual startup. If you need to disable auto-start or re-enable it, you can modify this setting at any time:1
Open the BARS Installer
Launch the BARS Installer application.
2
Navigate to Settings
Go to the Settings page.
3
Configure auto-start option
Toggle the “Start Pilot Client automatically with Microsoft Flight Simulator” option as desired.